How to Adhere Envelope Liners Like a Pro: A Step-by-Step Guide
Adding envelope liners is one of the easiest ways to elevate your stationery and leave a lasting impression. Whether you’re sending elegant wedding invitations, festive holiday greetings, or standout client mailers, LCI Paper’s envelope liners bring a polished and personal touch to your envelopes.
In this guide, we’ll show you exactly how to seal your liners at home—no professional assembly required! With a few tools and tips, your envelopes will look crisp, clean, and ready to wow.
Why Choose LCI Paper Envelope Liners?
LCI Paper’s envelope liners are pre-cut to fit perfectly in the envelopes we offer. Available in a wide variety of textures, colors, and finishes—including matte, metallic, translucent vellum, and smooth neutrals—these liners come in A1, A2, A6, A7, A7.5, and A9 sizes to match all your favorite envelope styles.
Disclaimer: Liners are cut to order and are non-refundable. We highly recommend ordering a sample before committing to a full order.
How to Attach Envelope Liners
These liner inserts are easy to assemble and can be adhered with most adhesives. Just line up the top of the liner with the gummed line inside your envelope, then attach using your favorite adhesive.
We will explore tips and tricks for a clean and professional look when adhering your liners in the next section.
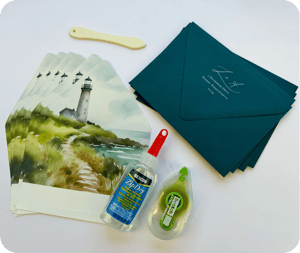
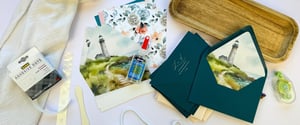
Supplies You’ll Need:
-
- Your favorite paper-safe adhesive
- Envelope liners and matching envelope
- Bone folder or your fingers for smoothing
- (Optional) A printed liner design
Ways to Adhere Your Liners to Your Envelopes:
-
- Zip Dry Paper Glue
- Elmers glue
- Glue stick
- Double sided tape
- Sticky dots or double sided adhesive dots
While any paper-safe adhesive will work—such as Elmer’s glue, glue sticks, or double-sided tape—we highly recommend Zip Dry glue, which is available in our shop. Zip Dry is a no-wrinkle paper glue that dries clear and is easy to work with. It’s acid and lignin free and will not harm photographs.
Please note your choice of adhesive may be more or less visible and a good quality adhesive will help ensure your liners stay put even after sending.
For a comparison of adhesive methods, visit How to Attach a Vellum Envelope Liner Invisibly.
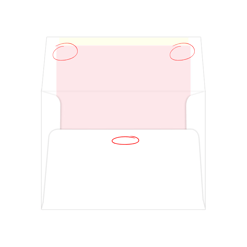
Where to Place your Adhesive
Depending on the shape of your liners (euro flap or straight flap), you will need to place your choice of adhesive in different locations.

-
- Place 2 dots of adhesive below the line where your envelope meets the flap – this will help hide the glue
- Use a very thin line of glue or a short strip of double-sided tape along the top edge of the liner—right where it tucks under the envelope flap.
-
- Place 2 small dots of adhesive or a thin strip of tape in the top right and left corners
- Place a thin line of adhesive in the center, below the line where your envelope meets the flap
Pro tip: Camouflage Adhesive Under Printing — If your liner is printed, place adhesive under a big printed flower for example to easily hide any adhesive marks.
Regardless of the adhesive you use, you will want to apply your adhesive carefully and sparingly as it can show through the liners due to the inserts being light weight.
We strongly recommend testing samples before lining all of your envelopes. You may even want to try out different adhesives to compare their performance and observe how each one dries before purchasing your full order.
How to Your Seal to Your Envelope Liners
After applying your adhesive, allow it to dry for a few moments before placing the liner inside the envelope. Carefully align the top of your liner with the gummed edge of the envelope. Use your fingers to smooth the liner down gently but firmly. For extra precision and to avoid transferring any adhesive from your hands, a bone folder can be a helpful tool.
Let the adhesive dry completely before folding your envelopes. Folding too early can cause the liner to shift or wrinkle if the adhesive hasn’t fully set.
Once dry, fold your envelopes and prepare to insert your cards.
Just like that, your envelopes are beautifully lined and customized to your vision!
When you’re ready to seal and send, follow up with our 6 Ways to Seal Your Envelopes blog post for tips and inspiration.
For step-by-step instructions on sealing your finished envelopes, check out our How to Seal Your Envelopes blog post
Expert Tips for a Clean Finish
Before you line all your envelopes, we highly recommend following these tips and tricks for the best results.
Tips & Tricks to Adhering Your Liners:
-
- Use minimal adhesive— just two dots and a thin line go a long way. Too much glue may leave a wet mark.
- Conceal glue marks by placing them below printed artwork or where the flap naturally hides them.
- Let the adhesive set for a few seconds before pressing the liner into place.
- Smooth gently with your fingers or a bone folder.
- Test different adhesive methods before picking your favorite.
- Avoid layering adhesives on top of each other.
- Test before you commit. Try one liner with your adhesive of choice before doing the entire batch.
- Always order extra liners in case of mistakes or alignment hiccups.
Pro Tip: Want a flawless result? Follow our How to Attach a Vellum Envelope Liner Invisibly guide for a sleek finish.
How to Print on Envelope Liners at Home
Many of our liners, including vellum, are printable at home with inkjet or laser printers. However, we recommend testing with a sample first, as printer performance varies. You can use our free liner templates to make setup a breeze.
For a step-by-step guide to printing on envelope liners at home, follow our GUIDE.
Not sure if you want to print at home? No worries! We offer professional liner printing services in black, full color, or white ink. Just send us your design—we’ll handle the rest.
DIY Envelope Liners
Feeling crafty? LCI offers a step-by-step guide on creating your own envelope liners that can be used with our any of our papers or yours. Find out how you can print and make your own liners using LCI’s free DIY Liner blog post.
Pair it with our free printable envelope liner templates, and you’re good to go!
With just a few careful steps and the right adhesive, you can transform plain envelopes into elegant, professional-looking mail pieces. From weddings to corporate mailers, beautifully lined envelopes show attention to detail—and it all starts with knowing how to seal your liners the right way. Ready to get started?
You may also like:
What Size File Do I Need For Printing? | How to Seal Your Envelopes | Tape/Glue | How to Attach a Vellum Envelope Liner Invisibly