
How to Create Print-Ready Files in Canva: A Step-by-Step Guide
Designing your stationery or invitations on Canva? It’s easier than you think to ensure your file is print-ready! By following a few important steps, you can ensure that your design looks crisp, professional, and exactly how you envisioned it when printed. Click the video to dive into the process of creating print-ready files in Canva or follow the step by step guide below.
Step 1: Set Your Document Size and Include a Bleed (If Needed)
Before you start designing, it’s essential to create your file with the correct dimensions. Whether you’re working on wedding invitations, menus, or greeting cards, this is a critical step to ensure your design fits perfectly on the final printed piece.
-
- Go to Canva and select “Create a Design.”
- Enter your custom dimensions.
- Be sure to account for bleed (typically an extra 0.25 inches on each side), which ensures that your design extends to the very edge of the paper, leaving no unwanted white borders. This is important if your design or background color reaches the edges.
- For example, for an A7 invitations (5.125″ x7″), you’ll want to set the document to 5.375 x 7.25 inches to include a bleed.
Step 2: Create Your Design
Once your canvas is set up, you’re ready to get creative!
-
- Use Canva’s tools to add text, images, and other design elements.
- Pro Tip: If you plan to have your design printed with white backgrounds or margins, make sure you don’t have any extra design elements extending into those areas. Printers will pick up the smallest color variations that might not be visible on screen.
Step 3: Ensure Your Design is Ready for Downloading
Before exporting your design, make sure any text or design elements that need to be printed in 100% black or in white ink are actually 100% black (#000000). Also, if you’re using a white background, it should be pure white (#FFFFFF).
This is crucial because printers can pick up on even the slightest color differences, which could result in an unexpected tint in your final print. Avoid any off-white or near-black shades to ensure optimal quality. You will also want to ensure your design is centered and formatted to your liking.
Step 4: Save Your File as a Print-Ready PDF
Now that your design is complete, it’s time to save it as a print-ready file. This part is essential to ensure your file prints correctly, with no text or design shifts.
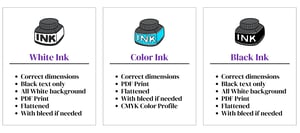
Follow these steps for a flawless download:
-
- Select “Download” in the upper right corner.
- In the dropdown menu, select “PDF Print” as the file type.
- Check off the “Flatten PDF” option. Flattening ensures your text and artwork won’t shift during printing, especially when uploaded to systems like LCI Paper’s.
- Make sure your file is set to the CMYK color profile. This ensures that your colors will print accurately.
- If you’re working with multiple pages, select the page(s) you want to include in your download.
- Save your download settings for future use if you plan to create multiple designs with the same format.
Once these steps are completed, hit Download, and you’ll have a high-quality, print-ready PDF file.
Step 5: Upload Your Print-Ready File to LCI Paper
Your file is now ready for printing! Head over to LCI Paper, where you can upload your design and start building your custom stationery collection. With LCI Paper’s high-quality printing services, your Canva design will come to life in beautiful detail.
Final Tips:
-
- Double-check all spelling and details in your design before saving.
- Always preview your final design to ensure everything looks right with the bleed and layout.
- Consider saving your design file on Canva for future edits or adjustments.
By following these simple steps, you’ll ensure your designs are print-ready and professional, perfect for any event or personal project!
You may also like:
How to Order Printed Cards | How to Upload Print Files | How Do I Order Printed Samples?