Card Borders & Bleeds | Print File Setup Requirements
When it comes to custom card printing, even the most beautiful designs can fall flat if the file setup isn’t done correctly. For the cleanest cuts, perfect borders, and professional-level results, setting up your design files the right way is absolutely essential. Whether you’re printing wedding invitations, greeting cards, or marketing materials, understanding borders, bleeds, and file sizing makes all the difference.
In this post, we’ll walk you through the basics of setting up your files for flawless card printing, including:
- How to tell if your card needs a bleed
- What size should you make your card
- How to set up your file for borders
- How to save your artwork for printing
- How to submit your artwork file
- Free Downloadable File Set Up Guide
How to Tell If Your Card Needs a Bleed
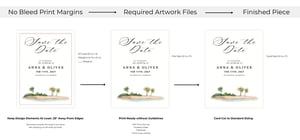
Start by asking yourself: Does my design extend to the edge of the card or come within 1/8 inch of the edge? If the answer is yes, your file will need a bleed.
A bleed is extra space—typically 0.125 inches on all sides—that ensures your design prints edge-to-edge without leaving unintentional white borders. During the trimming process, we cut off this excess area. This method guarantees clean, professional-looking edges.
If your design includes a bleed, keep important text and graphics at least 0.25 inches from the edge of the card. This allows 0.125 inches for the actual bleed and an additional 0.125 inches as a safety margin.
To explore our collection of free downloadable print templates click here.
What Size Should You Make Your Card?
Your card’s size depends on the final trim size and whether or not it includes a bleed. Before designing, determine the correct dimensions for your card type and printing preferences.
👉 Find Your File Size with our quick guide.
For example:
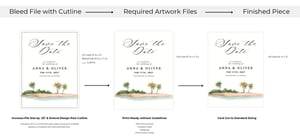
- A standard A7 card (5 1/8 x 7 inches) should be set up as 5 3/8 x 7 1/4 inches if a bleed is required.
- If no bleed is needed, the design can remain at exactly 5 1/8 x 7 inches.
Always confirm the required dimensions before you start designing.
FILE REQUIREMENTS FOR CARDS WITH NO BLEEDS
FILE REQUIREMENTS FOR CARDS WITH BLEEDS
How to Set Up Your File for Borders and Bleeds
Designing with borders requires extra attention. Borders can highlight imperfections if not placed correctly—especially during trimming.
Here’s how to set up for success:
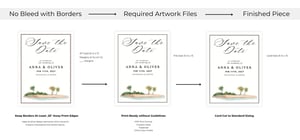
- Borders Without Bleeds: Make sure your border sits 0.25 inches inside the edge of the card on all sides.
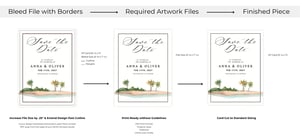
- Borders With Bleeds: Keep your border 0.375 inches from the edge of the file. This accounts for both the bleed and the safe zone. The rest of your design can extend fully to the edges.
⚠️ Keep in mind: 0.125 inches will be trimmed from all sides of a design with bleed, so plan accordingly to avoid cut-off elements.
FILE REQUIREMENTS FOR CARDS WITH BORDERS & NO BLEEDS
FILE REQUIREMENTS FOR CARDS WITH BORDERS & BLEEDS
Disclaimer: Due to the nature of digital printing and cutting, slight shifts—up to 1/4 inch—may occur. These minor variations are normal and within industry standards.
Save Your Artwork for Printing
Once your design is complete, it’s time to export it as a print-ready PDF. The process may vary depending on the program you’re using.
For more info on how to export your files as a print-ready PDF click here.
How to Submit Your Artwork for Custom Printing
You’re almost done! After saving your file, uploading it to LCI Paper is simple.
When placing your custom printed card order on our website:
-
- Find your favorite card from our vast collection of pre-cut cards.
- Choose your desired quantity then click Add Printing.
- Fill in your printing details (ie: print color and formatting)
- Click Upload File in the design interface (For multi-page PDFs, you will need to upload each page individually into our design system).
- Attach your print-ready PDF.
- Download your digital proof and approve.
- Add to Cart & Checkout!
Once submitted, we’ll take care of the rest—bringing your design to life with precision and care.
Setting up your card design for printing doesn’t have to be complicated, but it does require attention to detail. By following these best practices for bleeds, borders, and file formatting, you’ll ensure a polished final product that looks just as you imagined.
Don’t forget to grab your copy of our Free Card Print File Setup Guide to reference any time you’re designing!
Have questions? Reach out to our support team—we’re here to help.
You may also like:
Free Print Templates | How to Create Print Ready Files in Canva | Files Compatible with White Ink Printing | Card Printing with Variable Data